Android Studio开发——蓝牙聊天功能
Android Studio开发——蓝牙聊天功能
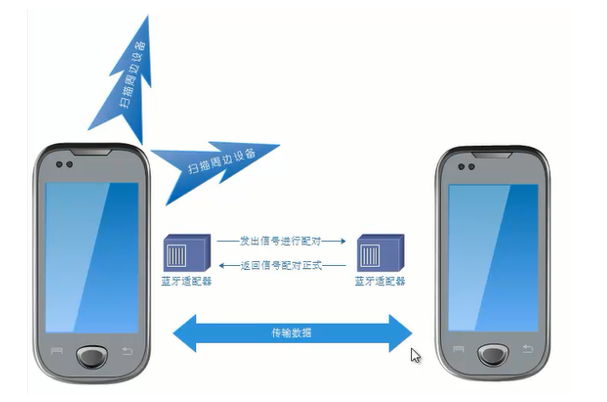
蓝牙工作流程
功能要求
在前期微信首页的基础上添加蓝牙聊天功能
实现要点
声明蓝牙权限
首先,要在新建项目中的AndroidManifest.xml中声明两个权限:BLUETOOTH权限和BLUETOOTH_ADMIN权限。其中,BLUETOOTH权限用于请求连接和传送数据;BLUETOOTH_ADMIN权限用于启动设备、发现或进行蓝牙设置,如果要拥有该权限,必须现拥有BLUETOOTH权限。
其次,因为android 6.0之后采用新的权限机制来保护用户的隐私,如果我们设置的targetSdkVersion大于或等于23,则需要另外添加ACCESS_COARSE_LOCATION和ACCESS_FINE_LOCATION权限,否则,可能会出现搜索不到蓝牙设备的问题。
    <uses-permission android:name="android.permission.ACCESS_FINE_LOCATION"/>
    <uses-permission android:name="android.permission.BLUETOOTH"/>
    <uses-permission android:name="android.permission.BLUETOOTH_ADMIN"/>
    <uses-permission-sdk-23 android:name="android.permission.ACCESS_COARSE_LOCATION"/>
添加程序运行的状态描述文本及配色代码
在文件res/values/strings.xml里,添加程序运行过程中的状态描述文本及配色代码等
<string name="send">发送</string>
<string name="not_connected">你没有链接一个设备</string>
<string name="bt_not_enabled_leaving">蓝牙不可用,离开聊天室</string>
<string name="title_connecting">链接中...</string>
<string name="title_connected_to">连接到:</string>
<string name="title_not_connected">无链接</string>
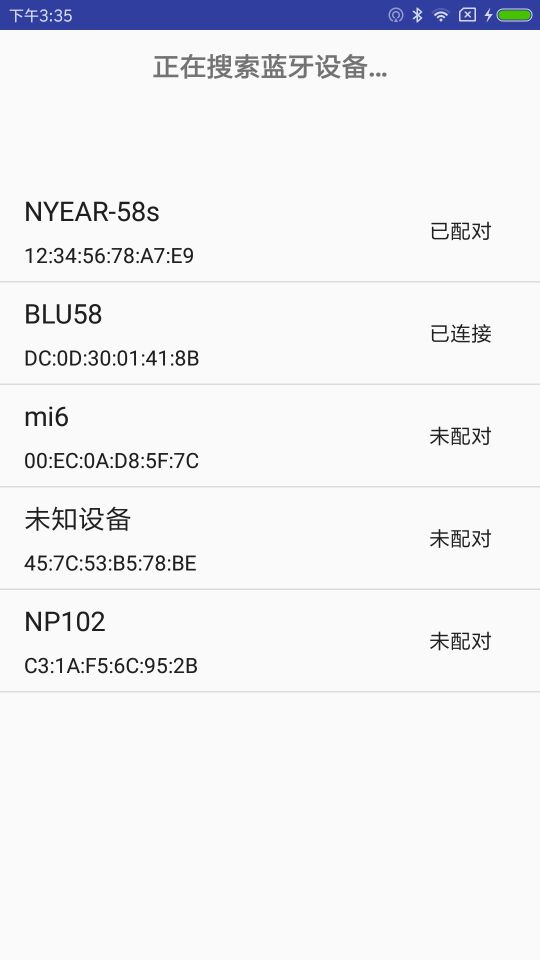
<string name="scanning">蓝牙设备搜索中...</string>
<string name="select_device">选择一个好友链接</string>
<string name="none_paired">没有配对好友</string>
<string name="none_found">附近没有发现好友</string>
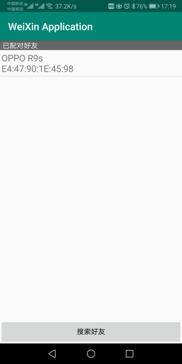
<string name="title_paired_devices">已配对好友</string>
<string name="title_other_devices">其它可连接好友</string>
<string name="button_scan">搜索好友</string>
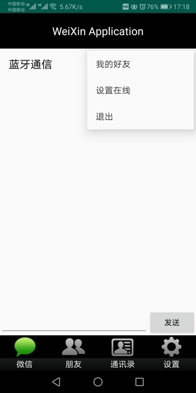
<string name="connect">我的好友</string>
<string name="discoverable">设置在线</string>
<string name="back">退出</string>
<string name="startVideo">开始聊天</string>
<string name="stopVideo">结束聊天</string>
布局文件
- tab01.xml(微信聊天页面布局)
- 添加1个Toolbar控件,其内包含2个水平的TextView控件;在Toolbar控件的下方添加1个ListView控件,用于显示聊天内容;最后在ListView控件的下方添加水平放置的1个EditText控件和一个Button控件
    <android.support.v7.widget.Toolbar
        android:id="@+id/toolbar"
        android:layout_width="match_parent"
        android:layout_height="wrap_content">
        <LinearLayout
            android:layout_width="match_parent"
            android:layout_height="match_parent"
            android:orientation="horizontal">
            <TextView
                android:id="@+id/title_left_text"
                style="?android:attr/windowTitleStyle"
                android:layout_width="0dp"
                android:layout_height="match_parent"
                android:gravity="center|start"
                android:layout_weight="1"
                android:ellipsize="end"
                android:singleLine="true" />
            <TextView
                android:id="@+id/title_right_text"
                android:layout_width="0dp"
                android:layout_height="match_parent"
                android:layout_weight="1"
                android:ellipsize="end"
                android:gravity="end|center"
                android:singleLine="true"
                android:textColor="#808080" />
        </LinearLayout>
    </android.support.v7.widget.Toolbar>

    <ListView android:id="@+id/in"
        android:layout_width="match_parent"
        android:layout_height="match_parent"
        android:stackFromBottom="true"
        android:transcriptMode="alwaysScroll"
        android:layout_weight="1" />
    <LinearLayout
        android:orientation="horizontal"
        android:layout_width="match_parent"
        android:layout_height="wrap_content">
        <EditText android:id="@+id/edit_text_out"
            android:layout_width="wrap_content"
            android:layout_height="wrap_content"
            android:layout_weight="1"
            android:layout_gravity="bottom" />
        <Button android:id="@+id/button_send"
            android:layout_width="wrap_content"
            android:layout_height="wrap_content"
            android:text="@string/send"/>
    </LinearLayout>
- optionmenu.xml
- 供主Activity使用的菜单文件res/menu/optionmenu.xml
<?xml version="1.0" encoding="utf-8"?>
<menu xmlns:android="http://schemas.android.com/apk/res/android">
    <item android:id="@+id/scan"
        android:icon="@android:drawable/ic_menu_myplaces"
        android:title="@string/connect" />
    <item android:id="@+id/discoverable"
        android:icon="@android:drawable/ic_menu_view"
        android:title="@string/discoverable" />
    <item android:id="@+id/back"
        android:icon="@android:drawable/ic_menu_close_clear_cancel"
        android:title="@string/back" />
</menu>
- device_list.xml
- 选择好友(即已经配对过的蓝牙设备)的界面布局文件devicelist.xml
<?xml version="1.0" encoding="utf-8"?>
<LinearLayout xmlns:android="http://schemas.android.com/apk/res/android"
    android:orientation="vertical"
    android:layout_width="match_parent"
    android:layout_height="match_parent">
    <TextView android:id="@+id/title_paired_devices"
        android:layout_width="match_parent"
        android:layout_height="wrap_content"
        android:text="@string/title_paired_devices"
        android:visibility="gone"
        android:background="#666"
        android:textColor="#fff"
        android:paddingLeft="5dp" />
    <ListView android:id="@+id/paired_devices"
        android:layout_width="match_parent"
        android:layout_height="wrap_content"
        android:layout_weight="1" />
    <TextView android:id="@+id/title_new_devices"
        android:layout_width="match_parent"
        android:layout_height="wrap_content"
        android:text="@string/title_other_devices"
        android:visibility="gone"
        android:background="#666"
        android:textColor="#fff"
        android:paddingLeft="5dp" />
    <!--android:visibility="gone"表示不占空间的隐藏,invisible是占空间-->
    <ListView android:id="@+id/new_devices"
        android:layout_width="match_parent"
        android:layout_height="wrap_content"
        android:layout_weight="2" />
    <Button android:id="@+id/button_scan"
        android:layout_width="match_parent"
        android:layout_height="wrap_content"
        android:text="@string/button_scan" />
</LinearLayout>
蓝牙会话的服务组件ChatService
/** 连接的名称*/
    private static final String NAME = "BlueToothChat";
    /** UUID*/
    // UUID:通用唯一识别码,是一个128位长的数字,一般用十六进制表示
    //算法的核心思想是结合机器的网卡、当地时间、一个随机数来生成
    //再创建蓝牙连接
    private static String strBlueTooth = "fa87c0d0-afac-11de-8a39-0800200c9a66";
    private static final UUID MY_UUID = UUID.fromString(strBlueTooth);
    private final BluetoothAdapter mAdapter;
    /** 线程中通信的更新UI的Handler*/
    private final Handler mHandler;

    private AcceptThread mAcceptThread;
    /** 监听到有客户端连接,新建一个线程单独处理,不然在此线程中会堵塞*/
    private ConnectedThread mConnectedThread;
    private ConnectThread mConnectThread;
    private int mState;
获取蓝牙适配器
mAdapter = BluetoothAdapter.getDefaultAdapter();
//获取蓝牙适配器
内部类:AcceptThread(接受新连接)
// 创建监听线程,准备接受新连接。使用阻塞方式,调用 BluetoothServerSocket.accept()
   private class AcceptThread extends Thread {
        private final BluetoothServerSocket mmServerSocket;

        public AcceptThread() {
            BluetoothServerSocket tmp = null;
            try {
                tmp = mAdapter.listenUsingRfcommWithServiceRecord(NAME, MY_UUID);
            } catch (IOException e) {
                e.printStackTrace();
            }
            mmServerSocket = tmp;
        }

        @Override
        public void run() {
            setName("AcceptThread");
            BluetoothSocket socket = null;
            while (mState != STATE_CONNECTED) {
                try {
                    socket = mmServerSocket.accept();
                } catch (IOException e) {
                    e.printStackTrace();           ////////
                }
                if (socket != null) {
                    synchronized (ChatService.this) {
                        switch (mState) {
                            case STATE_LISTEN:
                            case STATE_CONNECTING:
                                connected(socket, socket.getRemoteDevice());
                                break;
                            case STATE_NONE:
                            case STATE_CONNECTED:
                                try {
                                    socket.close();
                                } catch (IOException e) {
                                    e.printStackTrace();
                                }
                                break;
                        }
                    }
                }
            }
        }

        public void cancel() {
            try {
                mmServerSocket.close();
            } catch (IOException e) {
                e.printStackTrace();
            }
        }
    }
内部类:ConnectThread(发出连接)
    /*
        连接线程,专门用来对外发出连接对方蓝牙的请求和处理流程。
        构造函数里通过 BluetoothDevice.createRfcommSocketToServiceRecord() ,
        从待连接的 device 产生 BluetoothSocket. 然后在 run 方法中 connect ,
        成功后调用 BluetoothChatSevice 的 connected() 方法。定义 cancel() 在关闭线程时能够关闭相关socket 。
     */
    private class ConnectThread extends Thread {
        private final BluetoothSocket mmSocket;
        private final BluetoothDevice mmDevice;

        public ConnectThread(BluetoothDevice device) {
            mmDevice = device;
            BluetoothSocket tmp = null;
            try {
                tmp = device.createRfcommSocketToServiceRecord(MY_UUID);
            } catch (IOException e) {
                e.printStackTrace();
            }
            mmSocket = tmp;
        }

        @Override
        public void run() {
            setName("ConnectThread");
            mAdapter.cancelDiscovery();
            try {
                mmSocket.connect();
            } catch (IOException e) {
                connectionFailed();
                try {
                    mmSocket.close();
                } catch (IOException ex) {
                    ex.printStackTrace();
                }
                ChatService.this.start();
                return;
            }
            synchronized (ChatService.this) {
                mConnectThread = null;
            }
            connected(mmSocket, mmDevice);
        }

        public void cancel() {
            try {
                mmSocket.close();
            } catch (IOException e) {
                e.printStackTrace();
            }
        }
    }
内部类:ConnectedThread (已连接)
    /*
        双方蓝牙连接后一直运行的线程;构造函数中设置输入输出流。
        run()方法中使用阻塞模式的 InputStream.read()循环读取输入流,然后发送到 UI 线程中更新聊天消息。
        本线程也提供了 write() 将聊天消息写入输出流传输至对方,传输成功后回写入 UI 线程。最后使用cancel()关闭连接的 socket
     */
    private class ConnectedThread  extends Thread {
        private final BluetoothSocket mmSocket;
        private final InputStream mmInStream;
        private final OutputStream mmOutStream;

        public ConnectedThread(BluetoothSocket socket) {
            mmSocket = socket;
            InputStream tmpIn = null;
            OutputStream tmpOut = null;
            try {
                tmpIn = socket.getInputStream();
                tmpOut = socket.getOutputStream();
            } catch (IOException e) {
                e.printStackTrace();
            }
            mmInStream = tmpIn;
            mmOutStream = tmpOut;
        }

        @Override
        public void run() {
            byte[] buffer = new byte[1024];
            int bytes;
            while (true) {
                try {
                    bytes = mmInStream.read(buffer);
                    mHandler.obtainMessage(weixinFragment.MESSAGE_READ, bytes, -1, buffer).sendToTarget();
                } catch (IOException e) {
                    connectionLost();
                    break;
                }
            }
        }

        public void write(byte[] buffer) {
            try {
                mmOutStream.write(buffer);
                mHandler.obtainMessage(weixinFragment.MESSAGE_WRITE, -1, -1, buffer).sendToTarget();
            } catch (IOException e) {
                e.printStackTrace();
            }
        }

        public void cancel() {
            try {
                mmSocket.close();
            } catch (IOException e) {
                e.printStackTrace();
            }
        }
    }
Activity组件DeviceList
- 实现选取与之会话的蓝牙设备
本程序供菜单项主界面的选项菜单“我的友好”调用,用于:
(1)显示已配对的好友列表;
(2)搜索可配对的好友进行配对
(3)新选择并配对的蓝牙设备将刷新好友列表
注意:发现新的蓝牙设备并请求配对时,需要对应接受
关键技术:动态注册一个广播接收者,处理蓝牙设备扫描的结果
public class DeviceList extends AppCompatActivity {
    private BluetoothAdapter mBtAdapter;
    private ArrayAdapter<String> mPairedDevicesArrayAdapter;
    private ArrayAdapter<String> mNewDevicesArrayAdapter;
    public static String EXTRA_DEVICE_ADDRESS = "device_address";  //Mac地址
    //定义广播接收者,用于处理扫描蓝牙设备后的结果
    private final BroadcastReceiver mReceiver = new BroadcastReceiver() {
        @Override
        public void onReceive(Context context, Intent intent) {
            String action = intent.getAction();
            if (BluetoothDevice.ACTION_FOUND.equals(action)) {
                BluetoothDevice device = intent.getParcelableExtra(BluetoothDevice.EXTRA_DEVICE);
                if (device.getBondState() != BluetoothDevice.BOND_BONDED) {
                    mNewDevicesArrayAdapter.add(device.getName() + "\n" + device.getAddress());
                }
            } else if (BluetoothAdapter.ACTION_DISCOVERY_FINISHED.equals(action)) {
                if (mNewDevicesArrayAdapter.getCount() == 0) {
                    String noDevices = getResources().getText(R.string.none_found).toString();
                    mNewDevicesArrayAdapter.add(noDevices);
                }
            }
        }
    };
    @Override
    protected void onCreate(Bundle savedInstanceState) {
        super.onCreate(savedInstanceState);
        setContentView(R.layout.device_list);
        //在被调用活动里,设置返回结果码
        setResult(Activity.RESULT_CANCELED);
        init();  //活动界面
    }
    private void init() {
        Button scanButton = findViewById(R.id.button_scan);
        scanButton.setOnClickListener(new View.OnClickListener() {
            public void onClick(View v) {
                Toast.makeText(DeviceList.this, R.string.scanning, Toast.LENGTH_LONG).show();
                doDiscovery();  //搜索蓝牙设备
            }
        });
        mPairedDevicesArrayAdapter = new ArrayAdapter<String>(this, R.layout.device_name);
        mNewDevicesArrayAdapter = new ArrayAdapter<String>(this, R.layout.device_name);
        //已配对蓝牙设备列表
        ListView pairedListView =findViewById(R.id.paired_devices);
        pairedListView.setAdapter(mPairedDevicesArrayAdapter);
        pairedListView.setOnItemClickListener(mPaireDeviceClickListener);
        //未配对蓝牙设备列表
        ListView newDevicesListView = findViewById(R.id.new_devices);
        newDevicesListView.setAdapter(mNewDevicesArrayAdapter);
        newDevicesListView.setOnItemClickListener(mNewDeviceClickListener);
        //动态注册广播接收者
        IntentFilter filter = new IntentFilter(BluetoothDevice.ACTION_FOUND);
        registerReceiver(mReceiver, filter);
        filter = new IntentFilter(BluetoothAdapter.ACTION_DISCOVERY_FINISHED);
        registerReceiver(mReceiver, filter);
        mBtAdapter = BluetoothAdapter.getDefaultAdapter();
        Set<BluetoothDevice> pairedDevices = mBtAdapter.getBondedDevices();
        if (pairedDevices.size() > 0) {
            findViewById(R.id.title_paired_devices).setVisibility(View.VISIBLE);
            for (BluetoothDevice device : pairedDevices) {
                mPairedDevicesArrayAdapter.add(device.getName() + "\n" + device.getAddress());
            }
        } else {
            String noDevices = getResources().getText(R.string.none_paired).toString();
            mPairedDevicesArrayAdapter.add(noDevices);
        }
    }
    @Override
    protected void onDestroy() {
        super.onDestroy();
        if (mBtAdapter != null) {
            mBtAdapter.cancelDiscovery();
        }
        this.unregisterReceiver(mReceiver);
    }
    private void doDiscovery() {
        findViewById(R.id.title_new_devices).setVisibility(View.VISIBLE);
        if (mBtAdapter.isDiscovering()) {
            mBtAdapter.cancelDiscovery();
        }
        mBtAdapter.startDiscovery();  //开始搜索蓝牙设备并产生广播
        //startDiscovery是一个异步方法
        //找到一个设备时就发送一个BluetoothDevice.ACTION_FOUND的广播
    }
    private AdapterView.OnItemClickListener mPaireDeviceClickListener = new AdapterView.OnItemClickListener() {
        public void onItemClick(AdapterView<?> av, View v, int arg2, long arg3) {
            mBtAdapter.cancelDiscovery();
            String info = ((TextView) v).getText().toString();
            String address = info.substring(info.length() - 17);
            Intent intent = new Intent();
            intent.putExtra(EXTRA_DEVICE_ADDRESS, address);  //Mac地址
            setResult(Activity.RESULT_OK, intent);
            finish();
        }
    };
    private AdapterView.OnItemClickListener mNewDeviceClickListener = new AdapterView.OnItemClickListener() {
        public void onItemClick(AdapterView<?> av, View v, int arg2, long arg3) {
            mBtAdapter.cancelDiscovery();
            Toast.makeText(DeviceList.this, "请在蓝牙设置界面手动连接设备",Toast.LENGTH_SHORT).show();
            Intent intent = new Intent(Settings.ACTION_BLUETOOTH_SETTINGS);
            startActivityForResult(intent,1);
        }
    };
    //回调方法:进入蓝牙配对设置界面返回后执行
    @Override
    protected void onActivityResult(int requestCode, int resultCode, Intent data) {
        super.onActivityResult(requestCode, resultCode, data);
        init();  //刷新好友列表
    }
}
蓝牙会话的Fragment组件程序
    @Override
    public synchronized void onResume() {
        //synchronized:同步方法实现排队调用
        super.onResume();
        if (mChatService != null) {
            if (mChatService.getState() == ChatService.STATE_NONE) {
                mChatService.start();
            }
        }
    }

    private void setupChat() {
        mConversationArrayAdapter = new ArrayAdapter<String>(view.getContext(), R.layout.message);
        mConversationView = view.findViewById(R.id.in);
        mConversationView.setAdapter(mConversationArrayAdapter);
        mOutEditText = view.findViewById(R.id.edit_text_out);
        mOutEditText.setOnEditorActionListener(mWriteListener);
        mSendButton = view.findViewById(R.id.button_send);
        mSendButton.setOnClickListener(new View.OnClickListener() {
            public void onClick(View v) {
                TextView textView = view.findViewById(R.id.edit_text_out);
                String message = textView.getText().toString();
                sendMessage(message);
            }
        });
        //创建服务对象
        mChatService = new ChatService(view.getContext(), mHandler);
        mOutStringBuffer = new StringBuffer("");
    }
    @Override
    public void onDestroy() {
        super.onDestroy();
        if (mChatService != null)
            mChatService.stop();
    }
    private void ensureDiscoverable() { //修改本机蓝牙设备的可见性
        //打开手机蓝牙后,能被其它蓝牙设备扫描到的时间不是永久的
        if (mBluetoothAdapter.getScanMode() != BluetoothAdapter.SCAN_MODE_CONNECTABLE_DISCOVERABLE) {
            Intent discoverableIntent = new Intent(BluetoothAdapter.ACTION_REQUEST_DISCOVERABLE);
            //设置在300秒内可见(能被扫描)
            discoverableIntent.putExtra(BluetoothAdapter.EXTRA_DISCOVERABLE_DURATION, 300);
            startActivity(discoverableIntent);
            Toast.makeText(view.getContext(), "已经设置本机蓝牙设备的可见性,对方可搜索了。", Toast.LENGTH_SHORT).show();
        }
    }
//使用Handler对象在UI主线程与子线程之间传递消息
private final Handler mHandler = new Handler() { //消息处理
@Override
public void handleMessage(Message msg) {
switch (msg.what) {
case MESSAGE_STATE_CHANGE:
switch (msg.arg1) {
case ChatService.STATE_CONNECTED:
mTitle.setText(R.string.title_connected_to);
mTitle.append(mConnectedDeviceName);
mConversationArrayAdapter.clear();
break;
case ChatService.STATE_CONNECTING:
mTitle.setText(R.string.title_connecting);
break;
case ChatService.STATE_LISTEN:
case ChatService.STATE_NONE:
mTitle.setText(R.string.title_not_connected);
break;
}
break;
case MESSAGE_WRITE:
byte[] writeBuf = (byte[]) msg.obj;
String writeMessage = new String(writeBuf);
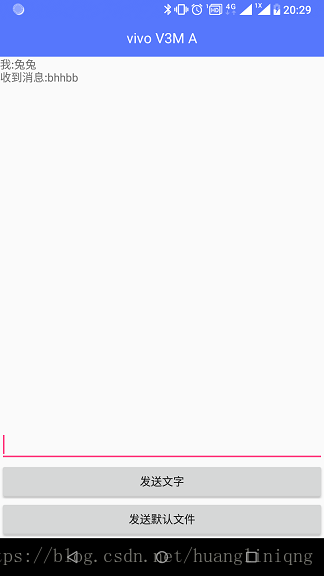
mConversationArrayAdapter.add("我: " + writeMessage);
break;
case MESSAGE_READ:
byte[] readBuf = (byte[]) msg.obj;
String readMessage = new String(readBuf, 0, msg.arg1);
mConversationArrayAdapter.add(mConnectedDeviceName + ": "
+ readMessage);
break;
case MESSAGE_DEVICE_NAME:
mConnectedDeviceName = msg.getData().getString(DEVICE_NAME);
Toast.makeText(getActivity().getApplicationContext(),"链接到 " + mConnectedDeviceName, Toast.LENGTH_SHORT).show();
break;
case MESSAGE_TOAST:
Toast.makeText(getActivity().getApplicationContext(), msg.getData().getString(TOAST), Toast.LENGTH_SHORT).show();
break;
}
}
};
运行效果(真机调试)
源码上传
https://gitee.com/moshangxveran/MyWeChat
参考文档
[Android Studio]蓝牙通信(Fragment中实现)
Android Studio 蓝牙开发实例——基于Android 6.0
Android近距离通信
智能推荐
android 开发之蓝牙开发
最近项目开发中蓝牙打印机需要用到蓝牙,所以在这里对蓝牙知识进行一个梳理和总结。 在使用蓝牙时有几个需要注意在这里新提出来 : 1: 权限 :前面两个蓝牙权限大家都会记住,如果你出现下面这个异常: 安卓6.0权限问题:Need ACCESS_COARSE_LOCATION or ACCESS_FINE_LOCATION permission... 因为。。。6.0系统上的蓝牙服务要和位置...
Android蓝牙开发(三)之蓝牙通信
上篇文章:https://blog.csdn.net/huangliniqng/article/details/82187966 上篇文章我们讲解了,蓝牙配对和蓝牙连接相关知识,还没有了解的朋友可先移步上篇文章。 1.蓝牙通信简介 无论是做Java还是Android开发的朋友肯定都比较熟悉Socket的连接,在java中通信用的是Socket,同样的蓝牙之间通信(这里说的是经典蓝牙)...

Android 蓝牙BLE开发详解
Android 蓝牙BLE开发详解 由于年初接手了个有关蓝牙BLE的项目,开始了对蓝牙ble的学习,经过长时间的慢慢学习(学得太慢,太拖了),终于了解了该怎么写蓝牙BLE,现在就给大家分享一下。 一、了解蓝牙BLE 1、什么是BLE 首先,我们来了解一下,什么是蓝牙BLE。 BLE的全名是 Bluetooth Low Energy 就是低功耗蓝牙的意思,支持 API18(Android...
ANDROID 蓝牙4.0 BLE 开发
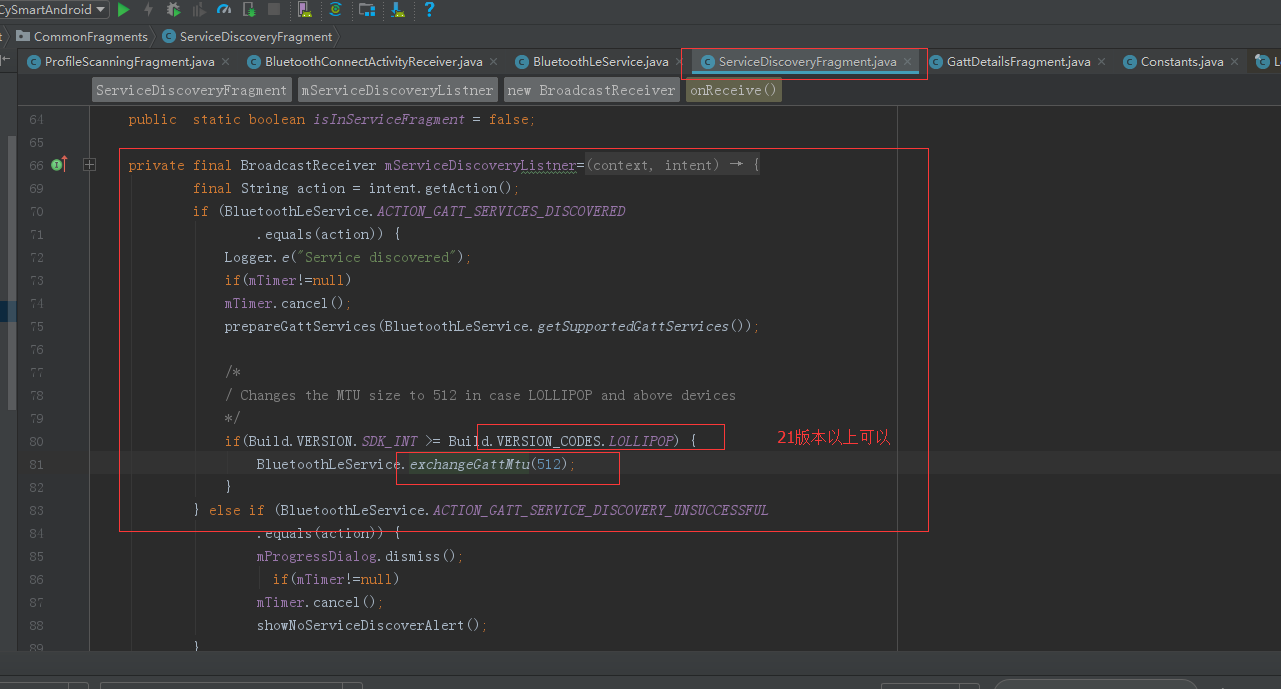
1.蓝牙配对问题 硬件发起配对,和手机发起配对,不一样的; 当时在设备发起配对时,很是疑惑,设备是如何发起配对的; 不知道怎么弄; 后来才知道,链接上设备后,gatt服务链接过程中,会收到设备发起的广播; 我弄得监听广播接收,有接收数据;这才明白; 1.1要在manifest里注册广播接收; 1.2新建一个接收类 android系统接收到设备发起得配对广播后,就会弹出配对密码框; 这时候注意; 会...
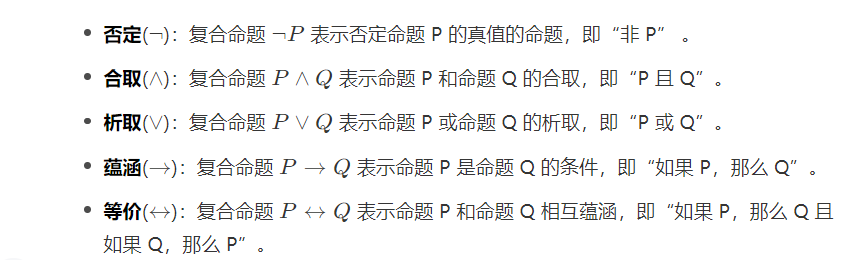
人工智能基础-数学方法-形式逻辑
1956 年召开的达特茅斯会议宣告了人工智能的诞生。在人工智能的襁褓期,各位奠基者们,包括约翰·麦卡锡、赫伯特·西蒙、马文·明斯基等未来的图灵奖得主,他们的愿景是让“具备抽象思考能力的程序解释合成的物质如何能够拥有人类的心智”。 通俗地说,理想的人工智能应该具备抽象意义上的学习、推理与归纳能力,其通用性将远远强于解决国际象棋或是围棋...
猜你喜欢
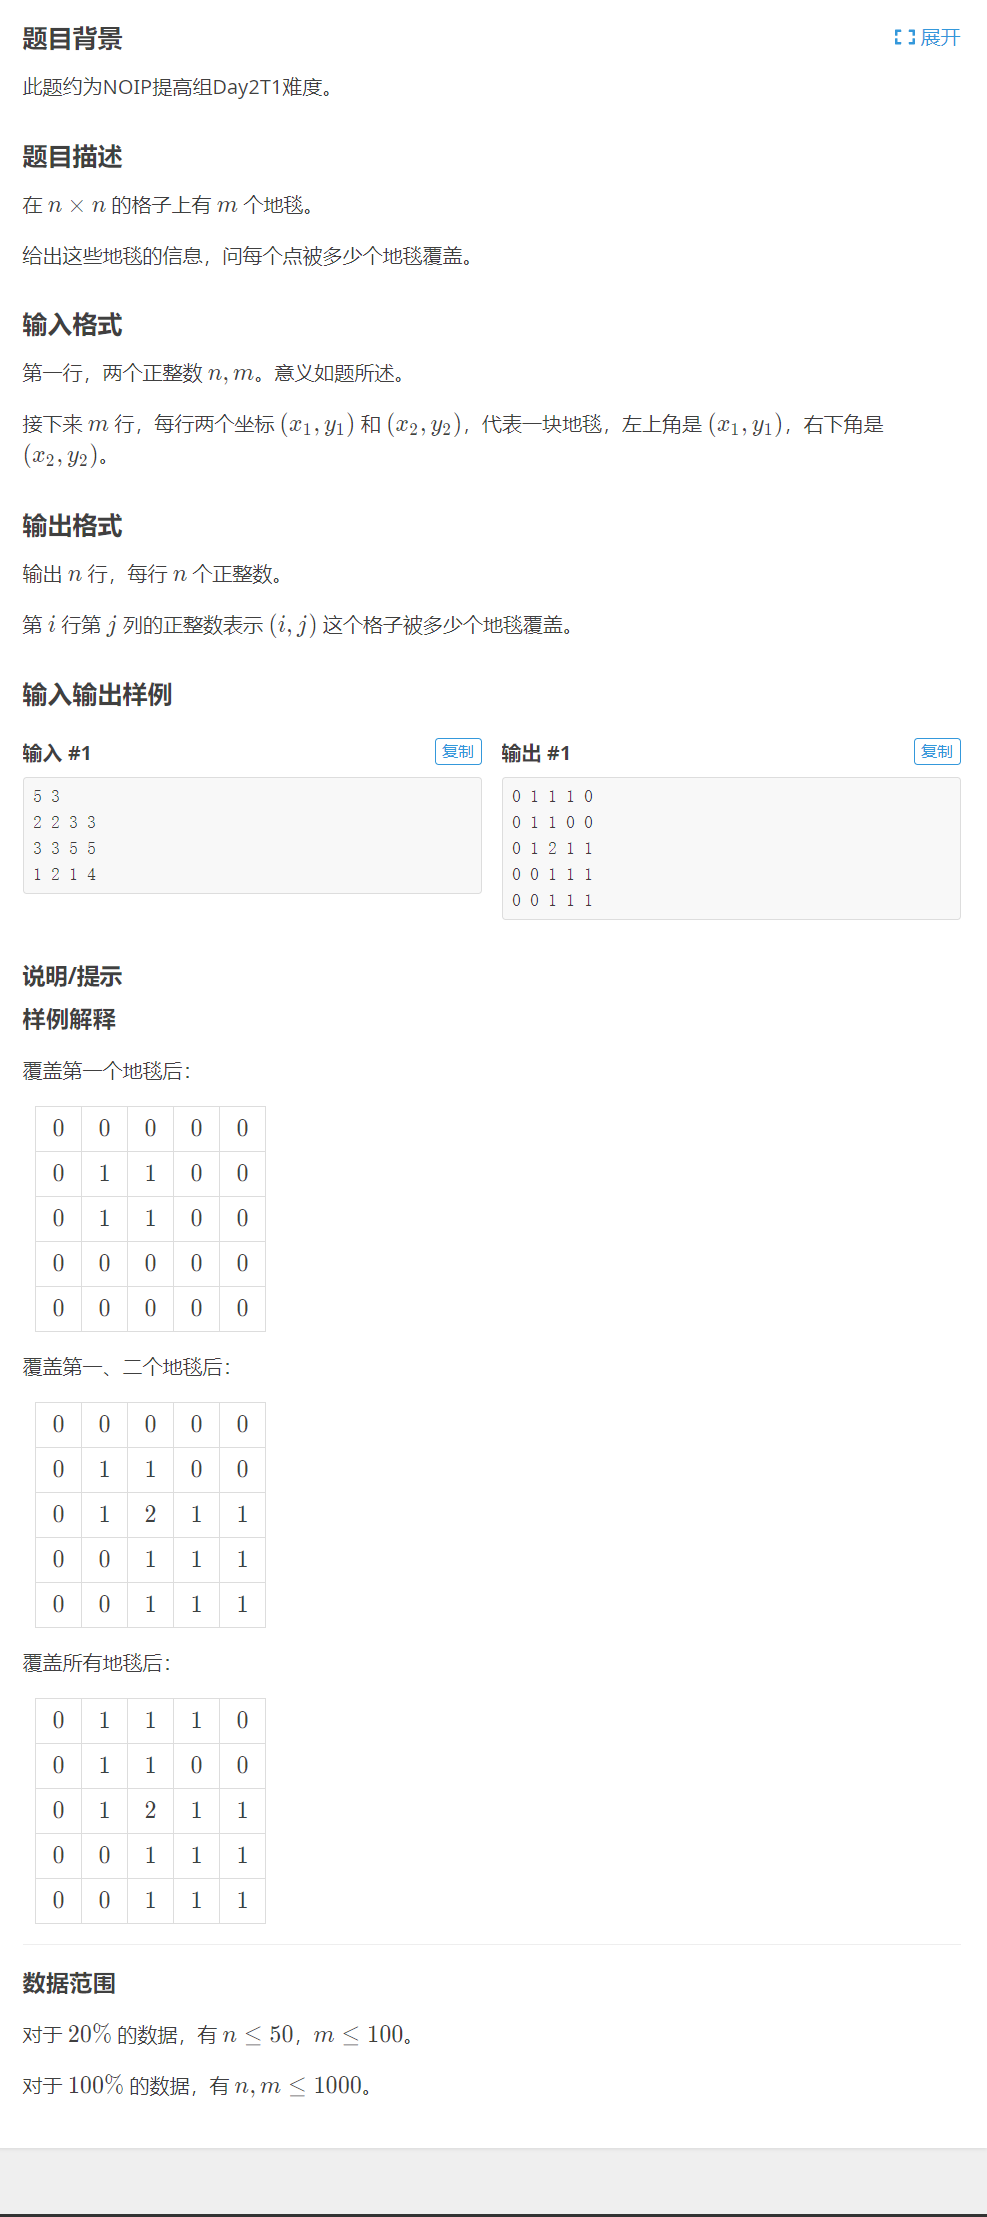
P3397 地毯——题解2020.10.3
P3397 地毯 思路分析 定义一个二维数组 a[ ][ ]存放每个点覆盖地毯的个数,下标表示每个点的坐标; 设置一个二重循环依次遍历每个地毯覆盖的坐标范围,使地毯覆盖范围内点的值+1; 打印出该二维数组 a[ ][ ]即为本题答案; 注意事项 由题可知:对于20%的数据,有 n≤50,m≤100;对于100%的数据,有 n,m≤1000;所以数组定义为a[1003][1003]...
反射注解案例
1、反射案例: 需求 写一个"框架",不能改变该类的任何代码的前提下,可以帮我们创建任意类的对象,并且执行其中任意方法 实现: 配置文件 反射 步骤: 创建对象 将需要创建的对象的全类名和需要执行的方法定义在配置文件中 在程序中加载读取配置文件 使用反射技术来加载类文件进内存 执行方法 第一步:Person类(创建对象) 第二步:配置文件 pro.properties(将需要创...

lambert与half lambert模型逐顶点和逐片元的漫反射光照
兰伯特模型 逐顶点光照 逐片元光照: 效果对比:左边为逐片元光照。右边为逐顶点光照。右边明暗交界处有较明显的锯齿 半兰伯特光照模型 兰伯特模型的一个问题就是背光面只有一种颜色,缺乏立体感。Half Lambert用于解决这个问题 半兰伯特模型公式: 与兰伯特模型的差别主要在于不同于将背光面光都设为0,它将背光的光也即负值也映射到[0,1]区间。避免了背光的颜色只有0这一种值。需要注意的是,half...
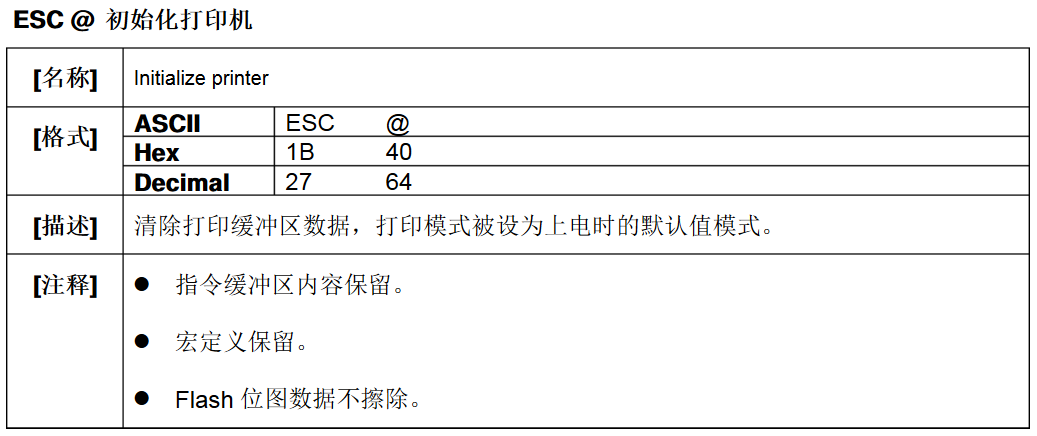
票据打印机-ESC/POS指令使用
给打印机输入串口命令,是打印机处于一种状态,然后就能干你想让他干的活了.百度ESC/POS文档随便拿一个正规的都一样,就不在这里放地址了,拿到这个文档以后代码的编写我只举一个例子,其它的模式也都一样 比如说这个功能为初始化打印机,他有三种输入模式,第一种是ASCII码(ESC @),第二种是Hex也就是16进制数(1B 40),第三种Decimal十进制数(27 64),我以16进制为例,那么他的...