Unity2D:简单人物纸娃娃换装实现(一) 服装的变换
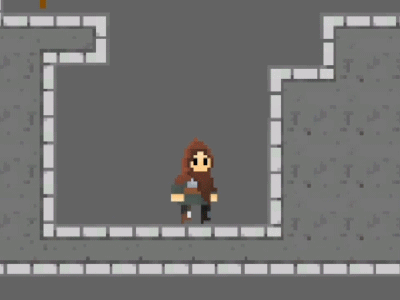
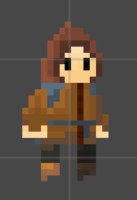
效果预览
鄙人不才,实现的方法较为粗暴,如果有更好的方案还望大神指教一二。
准备工作
巧妇难为无米之炊,制作换装系统首先得有“装备”才可以。如果大家会美术可以自己画,注意所有的素材的遮挡顺序和运动细节需要一致,当然如果用程序控制遮罩来实现更为优秀的遮挡管理我觉得也是可行的。
给大家看看我用的素材集合(自制)截图:
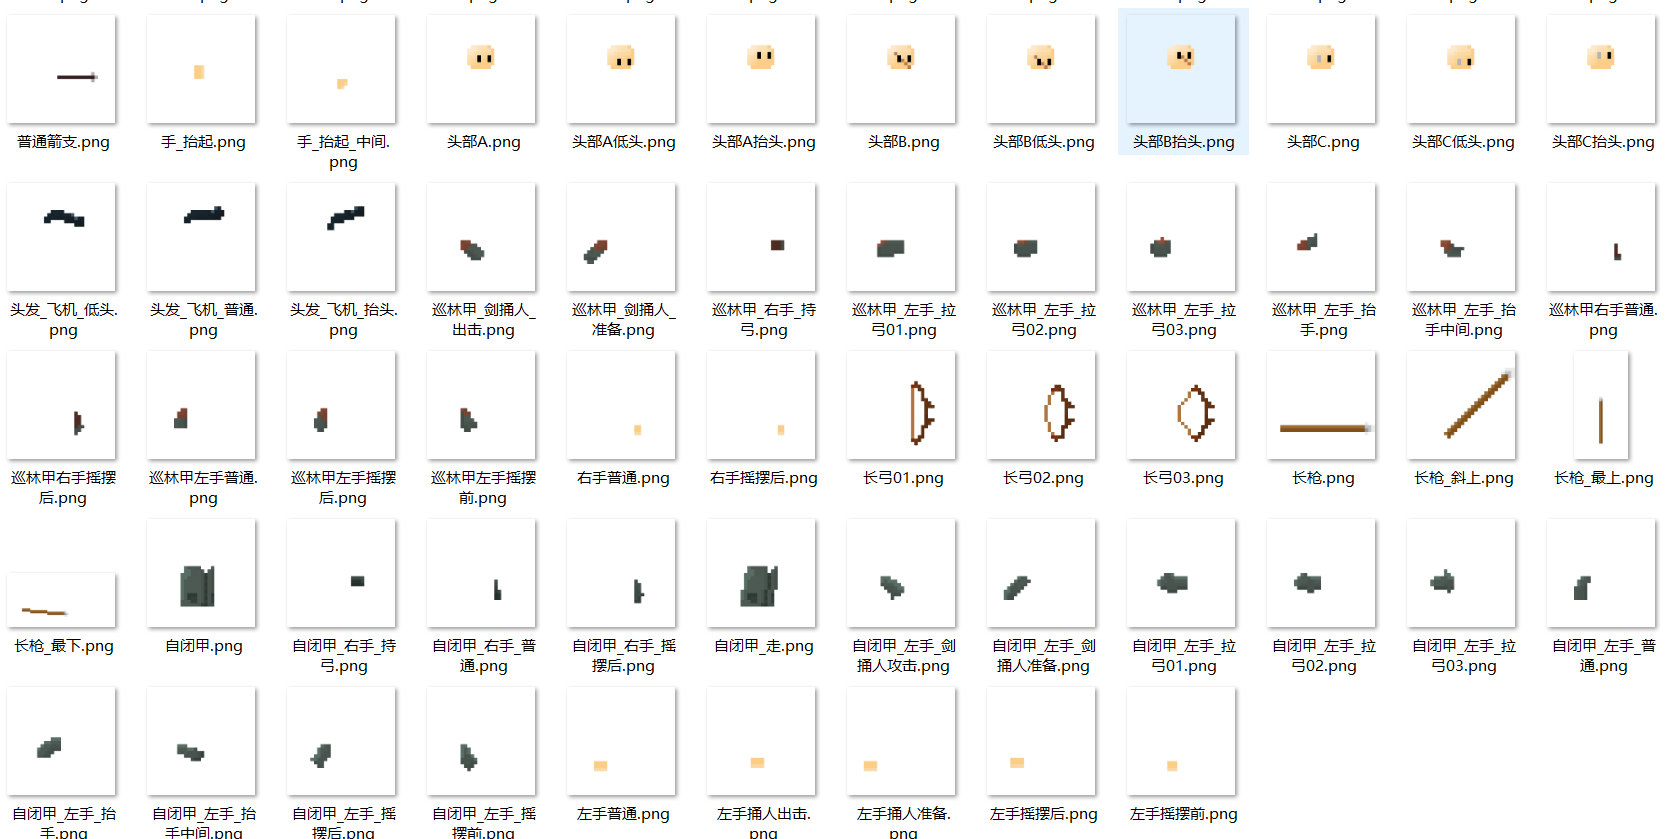
有了这些替换用的素材就可以开始实现换装了。
Plyer的建立

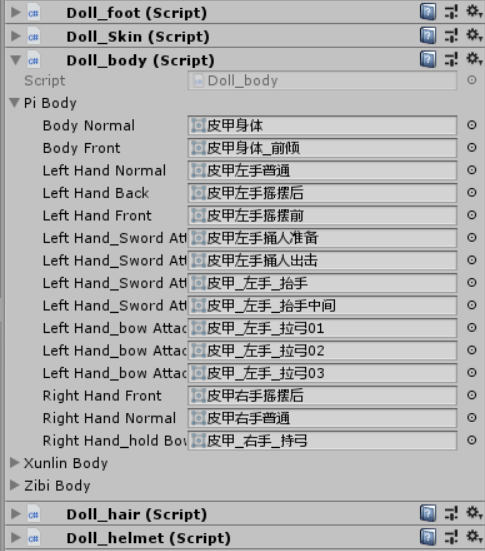
我将人物拆成了各个不同的身体部件,它们每一个都是一个SpriteRander,手部因为比较复杂所以拆的尤其的多。(这里的DrawCall可能会很高,用Shader来合并素材应该能节省性能,可惜我不会(*^_^*))
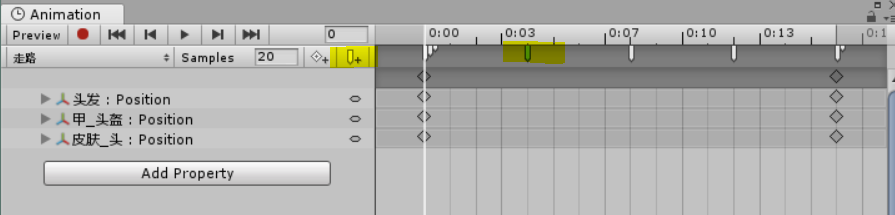
建立好Player之后,请手动确保渲染顺序(OrderInLayer)的正确性。
接下来要给人物建立好不同的动画,譬如走路跳跃攻击。这一步关于Unity本身动画状态机的使用相信大家都会的。
素材库的建立
使用类似的脚本来存储图片:
using System.Collections;
using System.Collections.Generic;
using UnityEngine;

//用以存储身体图片的类
public class Doll_body : MonoBehaviour
{
    //图片的存储结构体
    //使用此注解使其能显示在Unity的编辑面板上
    [System.Serializable]
    public struct DollBody
    {
        public Sprite bodyNormal;
        public Sprite bodyFront;

        public Sprite leftHandNormal;
        public Sprite leftHandBack;
        public Sprite leftHandFront;
        public Sprite leftHand_SwordAttackStab_prepare;
        public Sprite leftHand_SwordAttackStab_attack;
        public Sprite leftHand_SwordAttackCleave_up;
        public Sprite leftHand_SwordAttackCleave_mid;
        public Sprite leftHand_bowAttack_01;
        public Sprite leftHand_bowAttack_02;
        public Sprite leftHand_bowAttack_03;


        public Sprite rightHandFront;
        public Sprite rightHandNormal;
        public Sprite rightHand_holdBow;

    }

    //不同的装备
    public DollBody piBody;
    public DollBody xunlinBody;
    public DollBody zibiBody;
}
创建一个空物体名为“换装管理器 ”,给它加上上述组件,在拖动图片赋值,切换场景时注意不要销毁此物体。(因为是像素风游戏,所以图集比较小,大游戏的话也许得用更高效的素材库了,具体怎么实现没有思路)
创建下面这个脚本,同样作为“换装管理器 ”的组件,用来给各个图片组起个名字,方便调用。
using System.Collections;
using System.Collections.Generic;
using UnityEngine;

public class DollDictionary : MonoBehaviour
{
	public static Dictionary<string,Doll_foot.DollFoot> footDictionary = new Dictionary<string, Doll_foot.DollFoot>();
	public static Dictionary<string,Doll_body.DollBody> bodyDictionary = new Dictionary<string, Doll_body.DollBody> ();
	public static Dictionary<string,Doll_hair.DollHair> hairDictionary = new Dictionary<string, Doll_hair.DollHair>();
	public static Dictionary<string,Doll_helmet.DollHelmet> helmetDictionary =new  Dictionary<string, Doll_helmet.DollHelmet>();
	public static Dictionary<string,Doll_Skin.DollSkin> skinDictionary = new  Dictionary<string, Doll_Skin.DollSkin>();

	void Awake ()
	{
		Doll_foot tempDollFoot = this.GetComponent<Doll_foot> ();
			footDictionary.Add ("皮质腿甲", tempDollFoot.piFoot);
			footDictionary.Add ("巡林腿甲", tempDollFoot.xunlinFoot);
			footDictionary.Add("紧身裤", tempDollFoot.jinshengFoot);


		Doll_body tempDollBody = this.GetComponent<Doll_body> () ;
			bodyDictionary.Add ("皮质胸甲", tempDollBody.piBody);
			bodyDictionary.Add ("巡林胸甲", tempDollBody.xunlinBody);
			bodyDictionary.Add("自闭胸甲", tempDollBody.zibiBody);


		Doll_hair tempDollHair = this.GetComponent<Doll_hair> ();
			hairDictionary.Add ("普通", tempDollHair.putongHair);
			hairDictionary.Add ("半遮", tempDollHair.banzheHair);
			hairDictionary.Add ("丸子", tempDollHair.wanziHair);
			hairDictionary.Add ("莫辛甘", tempDollHair.moxingganHair);
			hairDictionary.Add("飞机头", tempDollHair.feijiHair);


		Doll_helmet tempDollHelmet = this.GetComponent<Doll_helmet> ();
			helmetDictionary.Add ("兜帽", tempDollHelmet.doumaoHelmet);
			helmetDictionary.Add ("巫师帽", tempDollHelmet.fashiHelmet);
			helmetDictionary.Add ("铁头盔", tempDollHelmet.metalHelmet);
			helmetDictionary.Add ("皮帽", tempDollHelmet.piHelmett);

		Doll_Skin tempDollSkin = this.GetComponent<Doll_Skin> ();
			skinDictionary.Add ("皮肤A", tempDollSkin.SkinTyprA);
			skinDictionary.Add ("皮肤B", tempDollSkin.SkinTyprB);
			skinDictionary.Add ("皮肤C", tempDollSkin.SkinTyprC);

	}
}
添加动画事件
给Player附上下面这个脚本,用以在特定的时候改变人物的图片。
其中SetBody(PlayerAttribute),用以改变人物的图集,PlayerAttribute是我自己定义的人物状态类,当里面的字段改变时会自动出发一个事件来调用SetBody更改图集。
setBodyXXX(),用以在动画中触发改变图片,众所周知,动画就是一系列变化的图片,这样便实现了动态。
using System.Collections;
using System.Collections.Generic;
using UnityEngine;

public class SwarpSprites : MonoBehaviour
{
	[SerializeField]
	SpriteRenderer helmetRender,hairRender,skinHeadRender,bodyRender,footRender;
	Sprite walkMid,walkFront,walkBack,footStand,footFall;
	Sprite bodyNormal,bodyFront;
	Sprite skinHeadNormal,skinHeadUp,skinHeadDown;
	Sprite helmetNormal,helmetUp,helmetDown;
	Sprite hairNormal,hairUp,hairDown;

	public SwarpHandSprites swarpHandSprites;
	void Start ()
	{
		setAll ();
	}

	public void setAll()
	{
		PlayerAttribute playerAttribute = this.GetComponent<PlayerAttribute> ();
		setFoot (playerAttribute);
		setBody (playerAttribute);
		setSkin (playerAttribute);
		setHelmet (playerAttribute);
		setHair (playerAttribute);
	}

	public void setBody(PlayerAttribute playerAttribute)
	{
		Doll_body.DollBody bodySet = DollDictionary.bodyDictionary [playerAttribute.bodyType];
		bodyNormal = bodySet.bodyNormal;
		bodyFront = bodySet.bodyFront;

        swarpHandSprites.bodyLeftHandNormal = bodySet.leftHandNormal;
        swarpHandSprites.bodyLeftHandFront = bodySet.leftHandFront;
        swarpHandSprites.bodyLeftHandBack = bodySet.leftHandBack;
        swarpHandSprites.bodyLeftHand_SwordAttackStab_prepare = bodySet.leftHand_SwordAttackStab_prepare;
        swarpHandSprites.bodyLeftHand_SwordAttack_attack = bodySet.leftHand_SwordAttackStab_attack;
        swarpHandSprites.bodyLeftHand_SwardAttackCleave_mid = bodySet.leftHand_SwordAttackCleave_mid;
        swarpHandSprites.bodyLeftHand_SwardAttackCleave_Up = bodySet.leftHand_SwordAttackCleave_up;
        swarpHandSprites.bodyLeftHand_bowAttack01 = bodySet.leftHand_bowAttack_01;
        swarpHandSprites.bodyLeftHand_bowAttack02 = bodySet.leftHand_bowAttack_02;
        swarpHandSprites.bodyLeftHand_bowAttack03 = bodySet.leftHand_bowAttack_03;


        swarpHandSprites.bodyRightHandNormal = bodySet.rightHandNormal;
        swarpHandSprites.bodyRightHandFront = bodySet.rightHandFront;
        swarpHandSprites.bodyRightHand_holdBow = bodySet.rightHand_holdBow;
	}

	//设置足部动画
	void setWalkMid()
	{ footRender.sprite = walkMid; }
	void setWalkFront()
	{ footRender.sprite = walkFront; }
	void setWalkBack()
	{ footRender.sprite = walkBack; }
	void setFootStand()
	{ footRender.sprite = footStand; }
	void setFootFallDown()
	{ footRender.sprite = footFall; }

	//设置身体动画
	public void setBodyNormal()
	{ bodyRender.sprite = bodyNormal; }
	void setBodyFront()
	{ bodyRender.sprite = bodyFront; }

	//还有很多...
	...

}
以上,就实现了一个简单的纸娃娃,最耗时的,其实是绘画各种替换素材的过程。
智能推荐

Vue——el-option下拉框绑定
1、正常使用v-for 进行遍历 下拉框内容,如果需要增加一个自定义的值,则加一个el-option el-option用法: 参数 说明 类型 可选值 默认值 value 选项的值 string/number/object — — label 选项的标签,若不设置则默认与 value 相同 string/number — — disabled 是否...
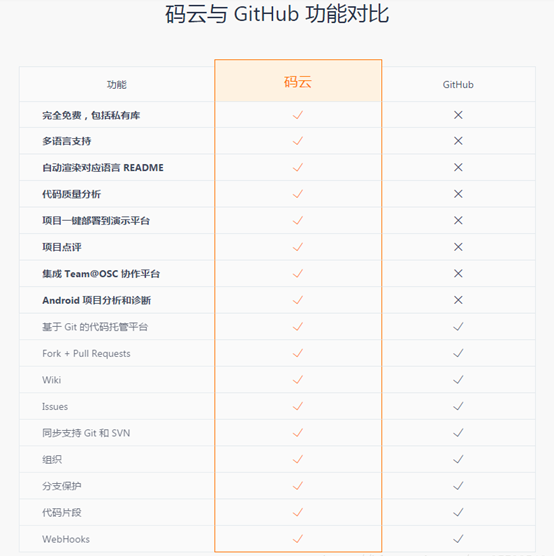
关于git与gitee的使用
关于在自己git与gitee代码托管平台的使用记录 (关于安装git和gitee就不在此唠叨了,网上一堆讲解(感兴趣的请看码云gitee入门)这里主要记录自己在使用过程中的遇到并解决的问题) 1.创建本地代码仓库 1)、在本地一个盘下新建一个文件夹,当作本地代码仓库,也就是说希望之后这个文件夹里的文件的改动都能被git进行管理。 2)初始一个本地仓库,之后可以看到在该文件夹下多了一个.git文件夹...
数据结构(C/C++)课程阶段总结(七)
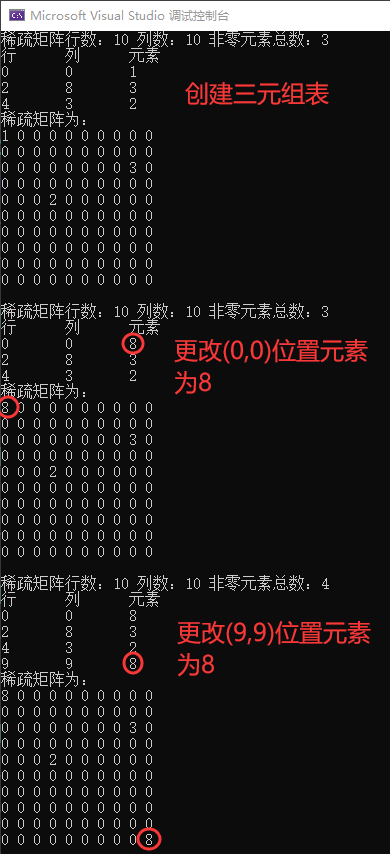
目录 写在前面 稀疏矩阵抽象数据类型定义 基本操作的实现方法 稀疏矩阵对应三元组表的创建 改变矩阵元素值 获取矩阵元素值 输出矩阵 具体实现 运行结果 总结 写在前面 课程采用教材《数据结构(C语言版)》严蔚敏,吴伟民,清华大学出版社。 本系列博文用于自我学习总结和期末复习使用,同时也希望能够帮助到有需要的同学。如果有知识性的错误,麻烦评论指出。 本次实验实现稀疏矩阵的三元组顺序存储表示。 稀疏矩...

Day 10 ajax介绍,初步了解
Day 10 ajax介绍,初步了解 一、ajax介绍 AJAX即“Asynchronous JavaScript and XML”(异步的JavaScript与XML技术) 传统的Web应用允许用户端填写表单(form),当提交表单时就向网页服务器发送一个请求。服务器接收并处理传来的表单,然后送回一个新的网页,但这个做法浪费了许多带宽,因为在前后两个页面中的大部分HTML...

Typora基础教程
目录 Typora基础教程 Markdown简介 Typora安装教程 mac安装教程 Windows安装教程 Markdown基本语法教程 Markdown的常用格式 Markdown的空格、换行与段落 Typora数学公式教程 Typora基础教程 Markdown简介 什么是Markdown: Markdown是一种轻量级的标记语言,用户通过一系列符号,如:#*[+$`,来表示粗体、斜体、超...
猜你喜欢

访问github无css样式的解决方案
1、浏览器右键查看加载失败的css文件来源 加载失败此处文件名会为红色 复制域名assets-cdn.github.com 2、查询css文件所在ip 打开https://www.ipaddress.com右上角输入框粘贴之前的css所在域名,点击搜索,记下搜索结果的ip 3、修改host文件 mac下: 打开finder(访达),点击右上角 前往-前往文件夹 输入/private,右键显示简介,...

Eclipse用maven构建SSM框架遇到的问题及解决方法
听说Maven很好用,刚刚好实验了Spring+Mvc企业应用实践的一个小项目,所以就拿它来练手了,用maven来重构它。 开发环境如下: Eclipse:Eclipse Project Release Notes 4.7 (Oxygen) JDK:JDK1.8.0_144 Maven:apache-maven-3.5.4 Tomcat:Tomcat 9 环境的配置就不多说了,其实只要有目录就行,...
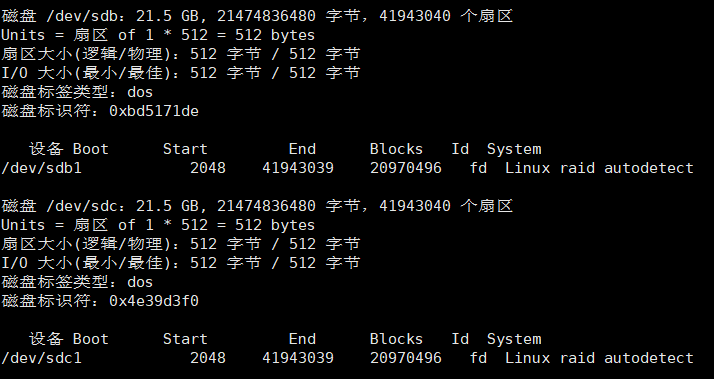
Raid磁盘管理
文章目录 前言 实验环境 实验操作步骤 RAID0 RAID1 RAID5 RAID6 RAID1+0 总结 前言 RAID称为独立冗余磁盘阵列,简单的说就是raid把多块独立的物理硬盘按不同的方式进行组合,形成硬盘组,从而提供比单个硬盘具有更高的存储性能和存储容量的数据备份技术。 RAID分不同的等级,不同的RAID在数据可靠性上做了不同的权衡。在实际应用中可以根据需求关系来确定使用哪个RAID...

常见排序算法总结——2、插入排序
常见排序方法 原创文章,转载请添加本网页链接 https://blog.csdn.net/qq_37334950/article/details/104378361 2、插入排序:将数组分为有序组(数组的第一个元素)和无序组(数组的第二个元素~最后一个元素),每次取出无序组的第一个元素,经过比较插入有序组的合适位置 举例: 初始数组:9 3 4 2 6 7 5 1 分组:(9)(3...
深度学习涂鸦! 我们的草图识别之旅
Doodling with Deep Learning! Our Journey with Sketch recognition 在这篇博客文章中,我们描述了我们的流程理解,拟合模型,并找到了Google Quick,Draw的有趣应用程序!数据集。 与我们一起走过这段旅程,看看我们如何应对成功分类“可以说是世界上最可爱的研究数据集”的挑战! 该项目由Akhilesh Re...