tqdm—Python进度条的使用
标签: python
转载:https://www.jb51.net/article/166648.htm
前言
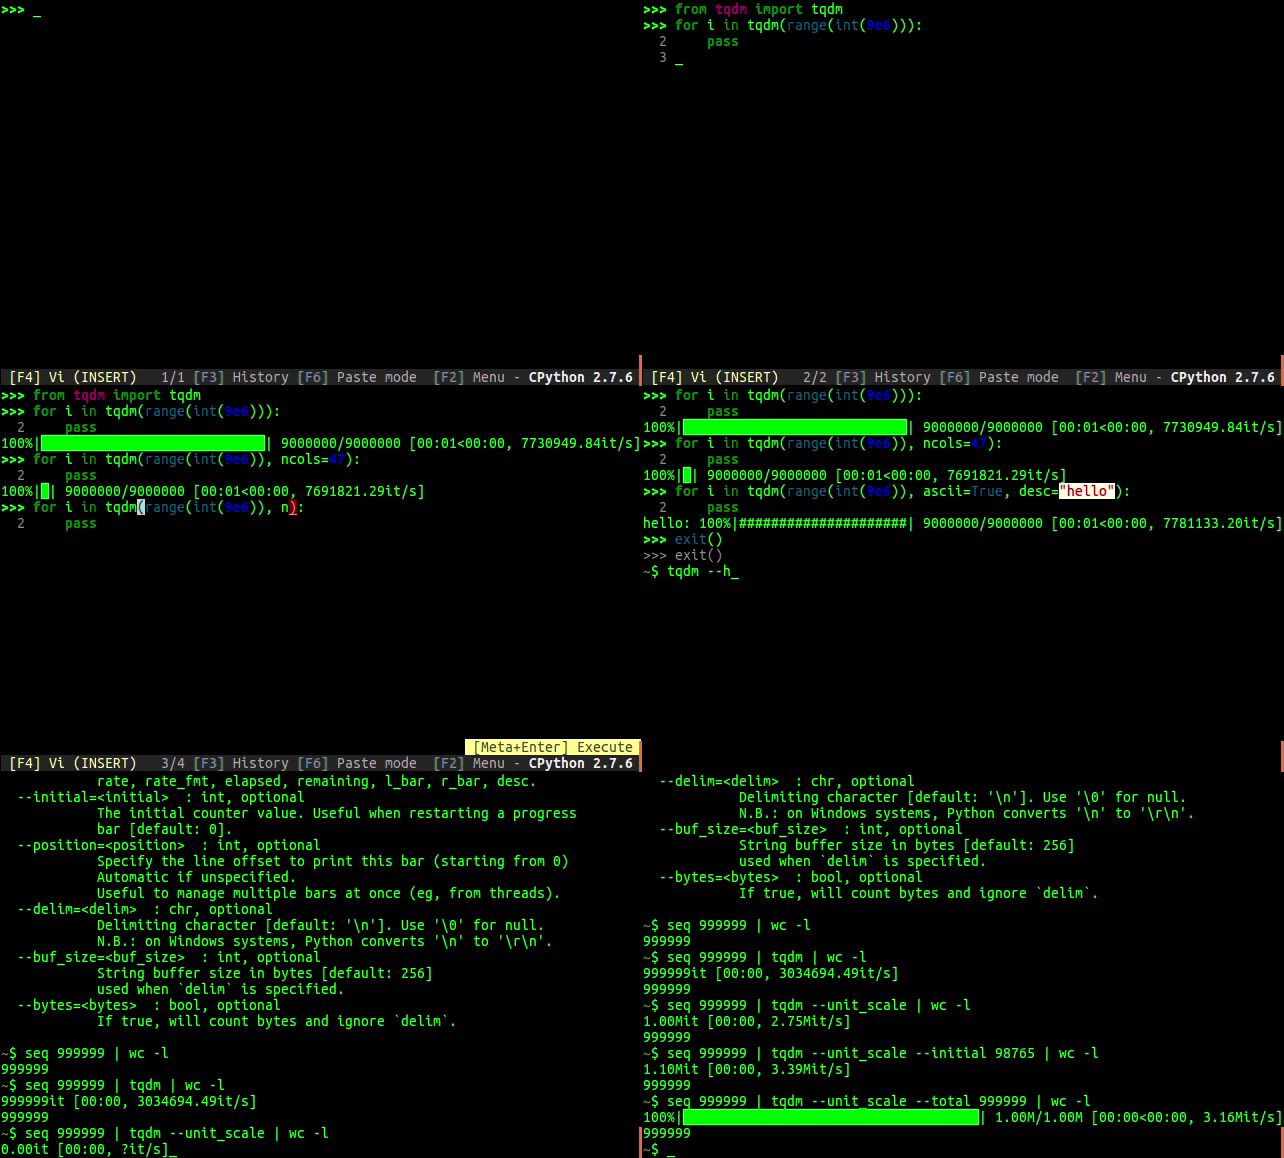
有时候在使用Python处理比较耗时操作的时候,为了便于观察处理进度,这时候就需要通过进度条将处理情况进行可视化展示,以便我们能够及时了解情况。这对于第三方库非常丰富的Python来说,想要实现这一功能并不是什么难事。
tqdm就能非常完美的支持和解决这些问题,可以实时输出处理进度而且占用的CPU资源非常少,支持windows、Linux、mac等系统,支持循环处理、多进程、递归处理、还可以结合linux的命令来查看处理情况,等进度展示。
迭代对象处理
对于可以迭代的对象都可以使用下面这种方式,来实现可视化进度,非常方便
from tqdm import tqdm
import time

for i in tqdm(range(100)):
  time.sleep(0.1)
  pass

在使用tqdm的时候,可以将tqdm(range(100))替换为trange(100)代码如下
from tqdm import tqdm,trange
import time

for i in trange(100):
  time.sleep(0.1)
  pass
观察处理的数据
通过tqdm提供的set_description方法可以实时查看每次处理的数据
from tqdm import tqdm
import time

pbar = tqdm(["a","b","c","d"])
for c in pbar:
  time.sleep(1)
  pbar.set_description("Processing %s"%c)

手动设置处理的进度
通过update方法可以控制每次进度条更新的进度
from tqdm import tqdm
import time

#total参数设置进度条的总长度
with tqdm(total=100) as pbar:
  for i in range(100):
    time.sleep(0.05)
    #每次更新进度条的长度
    pbar.update(1)

除了使用with之外,还可以使用另外一种方法实现上面的效果
from tqdm import tqdm
import time

#total参数设置进度条的总长度
pbar = tqdm(total=100)
for i in range(100):
  time.sleep(0.05)
  #每次更新进度条的长度
  pbar.update(1)
#关闭占用的资源
pbar.close()
linux命令展示进度条
不使用tqdm
$ time find . -name '*.py' -type f -exec cat \{} \; | wc -l
857365

real  0m3.458s
user  0m0.274s
sys   0m3.325s
使用tqdm
$ time find . -name '*.py' -type f -exec cat \{} \; | tqdm | wc -l
857366it [00:03, 246471.31it/s]
857365

real  0m3.585s
user  0m0.862s
sys   0m3.358s
指定tqdm的参数控制进度条
$ find . -name '*.py' -type f -exec cat \{} \; |
  tqdm --unit loc --unit_scale --total 857366 >> /dev/null
100%|███████████████████████████████████| 857K/857K [00:04<00:00, 246Kloc/s]
自定义进度条显示信息
通过set_description和set_postfix方法设置进度条显示信息
from tqdm import trange
from random import random,randint
import time

with trange(100) as t:
  for i in t:
    #设置进度条左边显示的信息
    t.set_description("GEN %i"%i)
    #设置进度条右边显示的信息
    t.set_postfix(loss=random(),gen=randint(1,999),str="h",lst=[1,2])
    time.sleep(0.1)

from tqdm import tqdm
import time

with tqdm(total=10,bar_format="{postfix[0]}{postfix[1][value]:>9.3g}",
     postfix=["Batch",dict(value=0)]) as t:
  for i in range(10):
    time.sleep(0.05)
    t.postfix[1]["value"] = i / 2
    t.update()

多层循环进度条
通过tqdm也可以很简单的实现嵌套循环进度条的展示
from tqdm import tqdm
import time

for i in tqdm(range(20), ascii=True,desc="1st loop"):
  for j in tqdm(range(10), ascii=True,desc="2nd loop"):
    time.sleep(0.01)
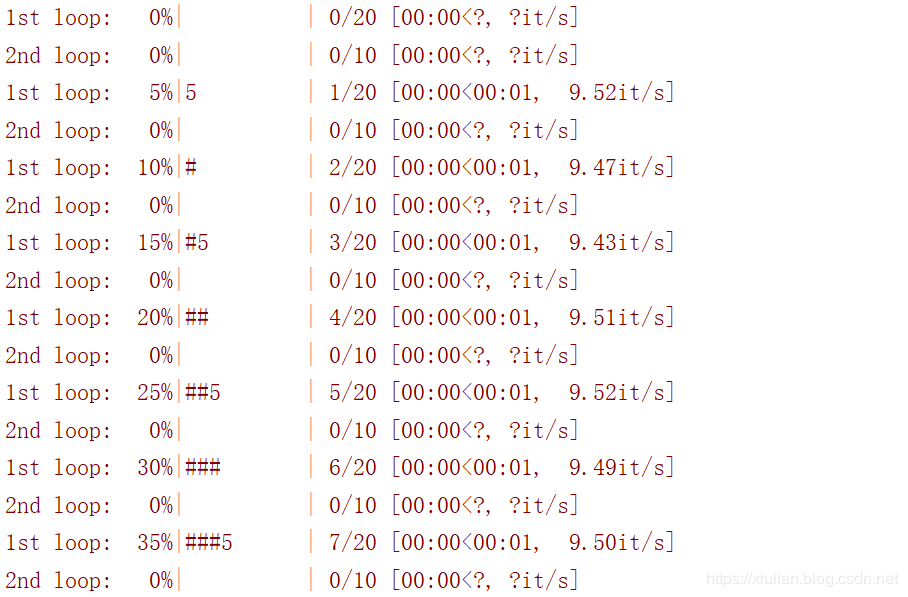
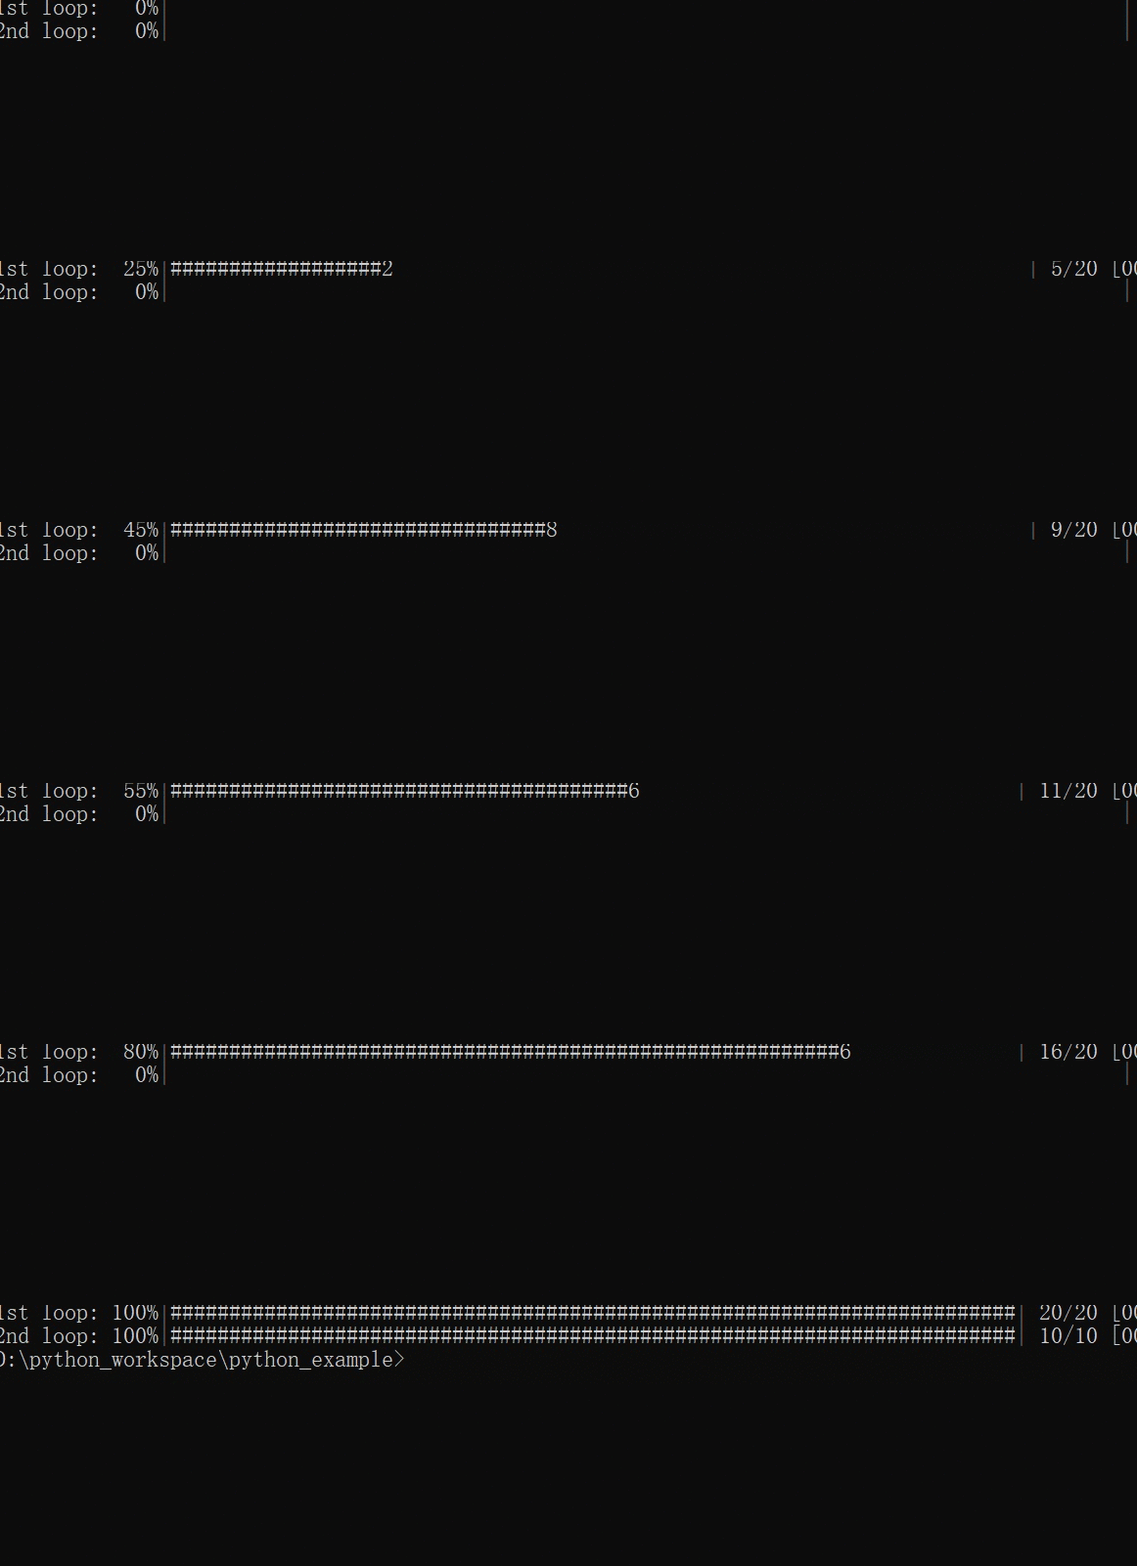
在pycharm中执行以上代码的时候,会出现进度条位置错乱,目前官方并没有给出好的解决方案,这是由于pycharm不支持某些字符导致的,不过可以将上面的代码保存为脚本然后在命令行中执行,效果如下
多进程进度条
在使用多进程处理任务的时候,通过tqdm可以实时查看每一个进程任务的处理情况
from time import sleep
from tqdm import trange, tqdm
from multiprocessing import Pool, freeze_support, RLock

L = list(range(9))

def progresser(n):
  interval = 0.001 / (n + 2)
  total = 5000
  text = "#{}, est. {:<04.2}s".format(n, interval * total)
  for i in trange(total, desc=text, position=n,ascii=True):
    sleep(interval)

if __name__ == '__main__':
  freeze_support() # for Windows support
  p = Pool(len(L),
       # again, for Windows support
       initializer=tqdm.set_lock, initargs=(RLock(),))
  p.map(progresser, L)
  print("\n" * (len(L) - 2))

pandas中使用tqdm
import pandas as pd
import numpy as np
from tqdm import tqdm

df = pd.DataFrame(np.random.randint(0, 100, (100000, 6)))


tqdm.pandas(desc="my bar!")
df.progress_apply(lambda x: x**2)

递归使用进度条
from tqdm import tqdm
import os.path

def find_files_recursively(path, show_progress=True):
  files = []
  # total=1 assumes `path` is a file
  t = tqdm(total=1, unit="file", disable=not show_progress)
  if not os.path.exists(path):
    raise IOError("Cannot find:" + path)

  def append_found_file(f):
    files.append(f)
    t.update()

  def list_found_dir(path):
    """returns os.listdir(path) assuming os.path.isdir(path)"""
    try:
      listing = os.listdir(path)
    except:
      return []
    # subtract 1 since a "file" we found was actually this directory
    t.total += len(listing) - 1
    # fancy way to give info without forcing a refresh
    t.set_postfix(dir=path[-10:], refresh=False)
    t.update(0) # may trigger a refresh
    return listing

  def recursively_search(path):
    if os.path.isdir(path):
      for f in list_found_dir(path):
        recursively_search(os.path.join(path, f))
    else:
      append_found_file(path)

  recursively_search(path)
  t.set_postfix(dir=path)
  t.close()
  return files

find_files_recursively("E:/")

注意
在使用tqdm显示进度条的时候,如果代码中存在print可能会导致输出多行进度条,此时可以将print语句改为tqdm.write,代码如下
for i in tqdm(range(10),ascii=True):
  tqdm.write("come on")
  time.sleep(0.1)
智能推荐
python tqdm进度条模块
安装tqdm 用tqdm调用原有迭代器即可 tqdm子模块tnrange, tqdm_notebook 参考链接:https://github.com/tqdm/tqdm Python中的base64模块 本文介绍Python 2.7中的base64模块,该模块提供了基于rfc3548的Base16, 32, 64编解码的接口。官方文档,参考这里。 该模块提供两套接口,传统接口基于rfc1...
Python 进度条库 - Tqdm
tqdm就能非常完美的支持和解决这些问题,可以实时输出处理进度而且占用的CPU资源非常少,支持循环处理、多进程、递归处理、还可以结合linux的命令来查看处理情况,等进度展示。 1.关于tqdm的简单用法 2.设置进度条的描述信息 3.手动控制进度条...

【Python】tqdm创建进度条
1.Introduction 每当代码中涉及 for 循环时,总想显示一个进度条,虽然用处不大,但是帅就完事了。之前在 Matlab 里实现过这个功能,这次在 Python 中试试~ 2.Materials and methods 首先嘛,肯定是面向百度编程,在百花齐放的方法中,肯定优先选择封装好的库函数,代码简洁明了。 接着目光锁定 tqdm,这货 github 居然还有这么多星星,今晚就是你了...
猜你喜欢
冒泡排序,及改进方式,性能优化400%>>>附图解加源码
首先源码附上,源码中带有注释,看不懂没关系,源码后面附带图解,最后附上代码效率提升图 源码如下: 方案一:其实实现很简单,两层循环,每次内层迭代出最大的一个值,将其放入数组最后一个位置,外层循环的末端便往前移一位。其原理如下图 方案一代码块: 方案二:优化改进 仔细观察上面的图,我们不难发现当迭代到图下这样的情况时,其实已经全排序好了,但是我们还是需要对它进行1,2,3,4,5,6的迭代,这些情况...
css3常用选择器
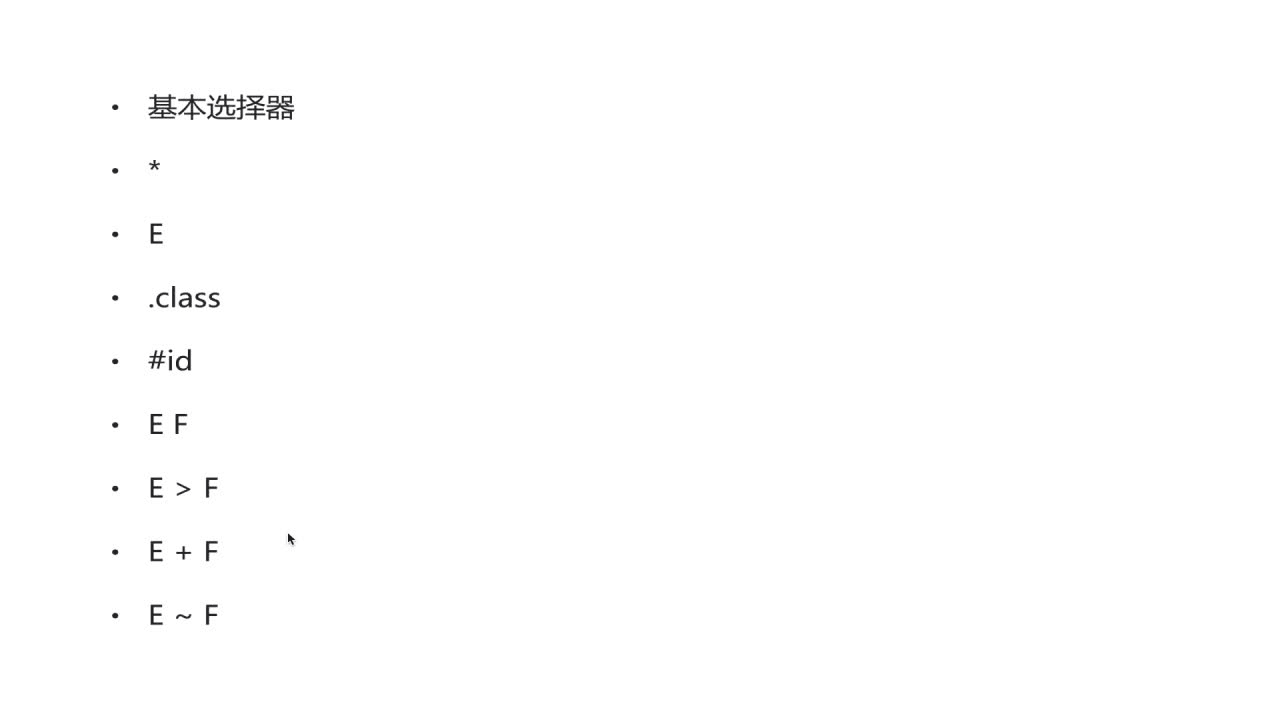
先介绍一下基本选择器,如下几种 *:通配符。选择页面的所有元素 E:元素选择器。对页面的一些元素进行选择,如p,div,li等 .class:类选择器 #id:id选择器。一个Id在一个页面中只能选择,这是和类选择器的区别 E F:后代选择器。如ul li。选中ul下的li E>F:子元素选择器。如下,可以用 h1 > strong {color:red;}使h1的子元素strong变...
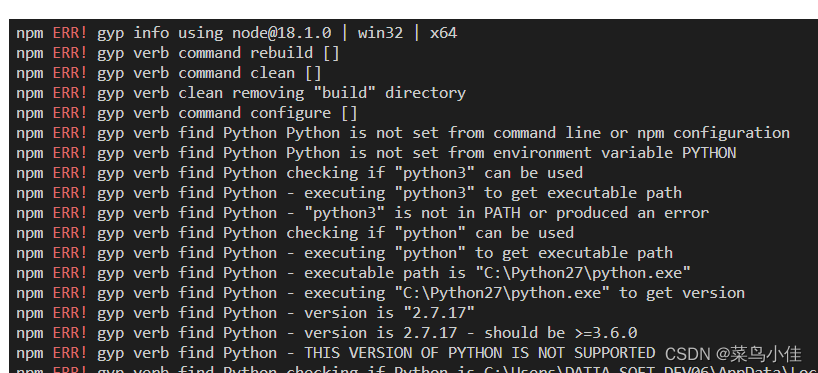
python is not set from command line or npm configuration
问题 猜测原因 python版本冲突 解决方案 去官网找到最新版本python 点击下载,注意记住你下载的目录,下载好以后,打开这个目录下的文件夹,Python310, 整个文件夹复制一下 在项目里运行npm config list --json 找到python的路径 我的是 C:\\Python27\\python.exe 说明项目里用的还是py...
Java8 Stream流操作
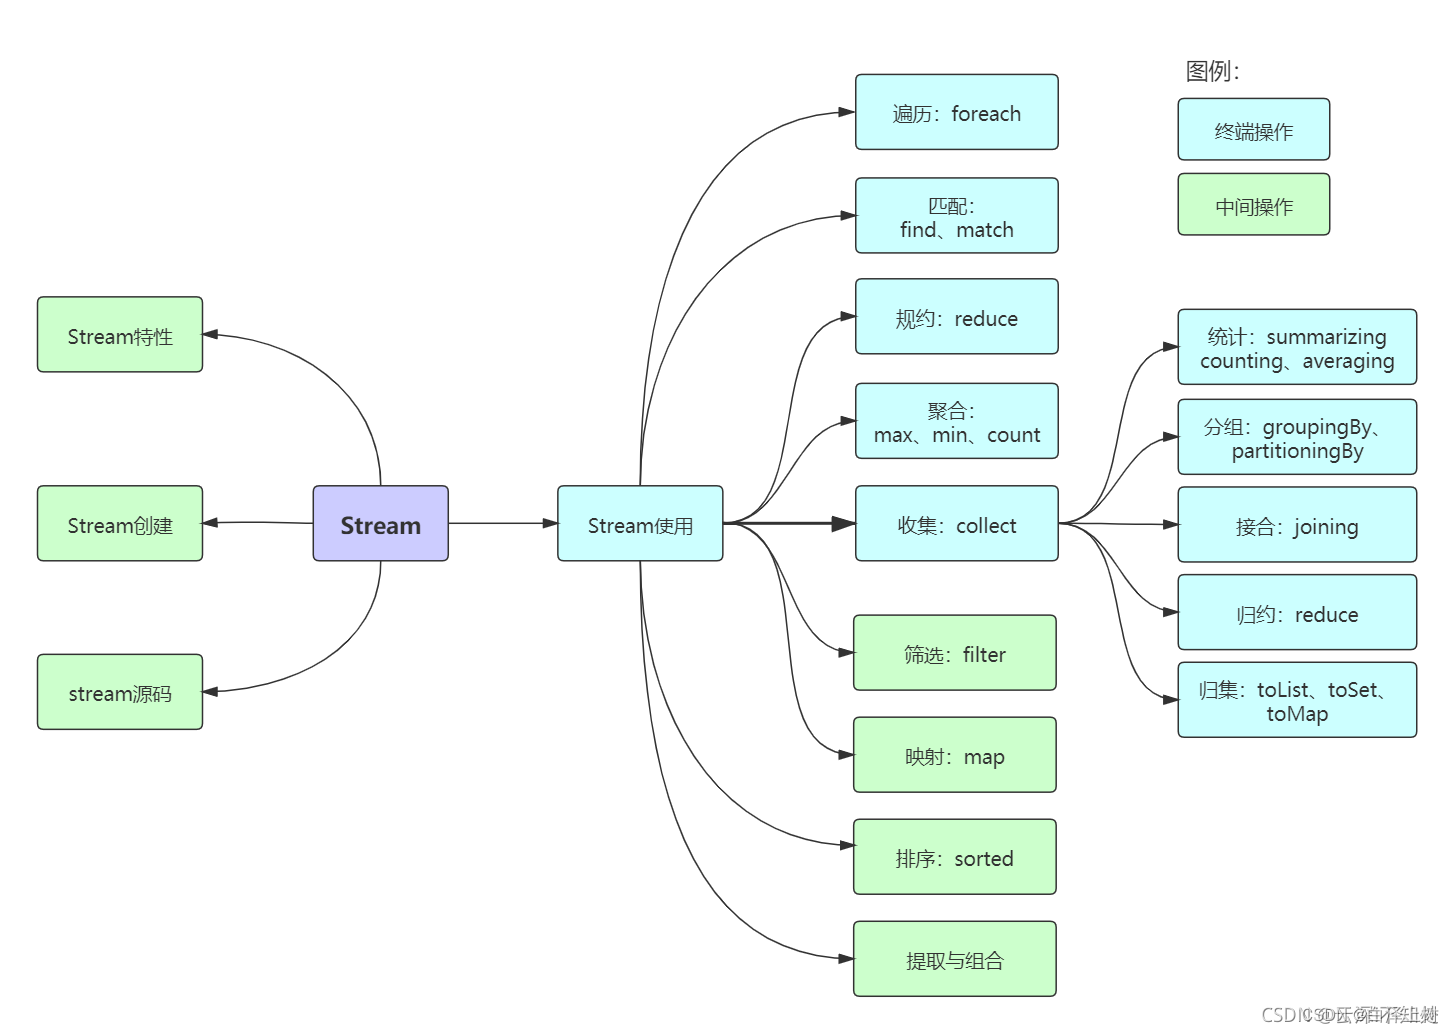
前言 我们常常需要将一个容器转化成另一个容器,或是对这个容器中的数据进行批量处理,这时使用Stream流可以大大减少我们的工作量。 1 Stream概述 Java 8 是一个非常成功的版本,这个版本新增的Stream,配合同版本出现的 Lambda ,给我们操作集合(Collection)提供了极大的便利。 那么什么是Stream? Stream将要处理的元素集合看作一种流,在流的过程中,借助St...
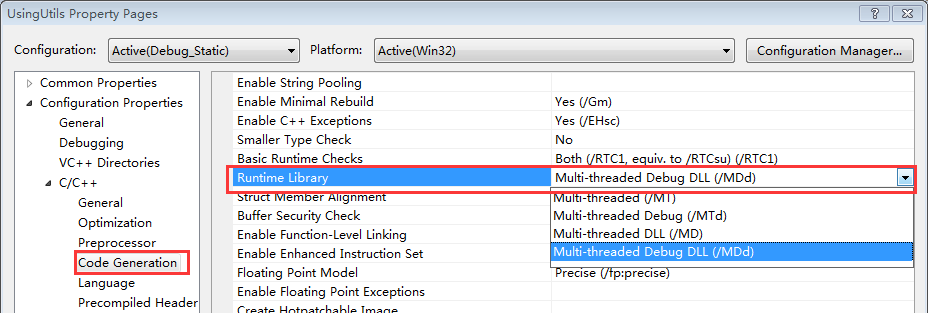
带你玩转Visual Studio——带你跳出坑爹的Runtime Library坑
在Windows下进行C++的开发,不可避免的要与Windows的底层库进行交互,然而VS下的一项设置MT、MTd、MD和MDd却经常让人搞迷糊,相信不少人都被他坑过,特别是你工程使用了很多第三库的时候,及容易出现各种链接问题。看一下下面这个错误提示: LIBCMT.lib(_file.obj) : error LNK2005: ___initstdio already defined...
